Showing posts with label Brazilian. Show all posts

Thursday, August 30, 2012

Brigadeiros (Brazilian Chocolate Truffles)

If there's one thing that you'll find at just about every party, of somebody of any age, from 1 to 100, at least in the U.S., it's probably... Well, I don't know. We don't really have that one thing- it might be pizza, soda, maybe a birthday cake? In Brazil, there is one thing you will always find: Brigadeiros.
These are the simplest chocolate truffles- a can of sweetened condensed milk, a few tablespoons of sweetened cocoa powder or hot chocolate mix, cooked until the right consistency, refrigerated, rolled into balls and then in chocolate sprinkles. Make them the size you want, throw them in some little candy cups (don't use mini cupcake wrappers, unless you want enough richness in each one to last you a week), and these chewy chocolate bites will be a huge hit. They are sweet, chocolatey, the perfect texture for everyone from babies to great-grandparents. If you don't want the fuss of rolling, spoon the hot mixture into shot glasses and it will be like having a little grown-up pudding cup. Either way, delicious, and a Brazilian classic. Enjoy! <3
Brigadeiros

1 14-oz. can sweetened condensed milk
1/4 cup sweetened cocoa powder or hot chocolate mix
chocolate sprinkles, for rolling

Stir together milk and chocolate in a large microwave-safe bowl.
Microwave for two minutes, stir, two minutes, stir. Microwave in one-minute increments until the mixture reaches the consistency of a thick caramel sauce: too thin for scooping but too thick for easy drizzling (this should only take an additional 2-3 minutes, but depends on your microwave.)
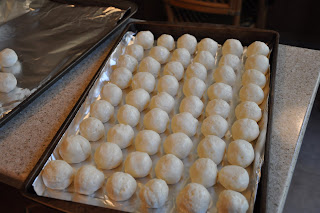
Refrigerate until completely cool and thickened, about 3 hours. Once cool, scoop into small balls (less than a tablespoon usually, but the size is up to you) and roll in chocolate sprinkles. Place in candy cups and leave at room temperature until serving.
Note: while in the microwave, the mixture may overflow; just pause, stir, and continue.

Wednesday, August 15, 2012

KitKat Ice Cream Torte

Remember how I was telling you about Brazilians and how much they love trifles? Well, this is a frozen trifle. A frifle? I decided to call it a torte.
In this party-perfect dessert, brigadeiro, the gooey chocolate made of sweetened condensed milk and cocoa powder that is often rolled into little truffles, is layered with KitKats and vanilla ice cream. The ice cream is filled with chocolate shavings- we bought it that way, but it's easy to do yourself if you can't find it to buy. The three layers go perfectly together: the crunchy, cookie-like KitKats, the gooey, chocolatey brigadeiro, and the creamy, cool ice cream.
According to my aunt, who taught me how to make this, it is easily adaptable. Don't want all the chocolate flavor in the brigadeiro? Just leave out the cocoa powder and make it just with the sweetened condensed milk and butter. If you don't want vanilla ice cream with chocolate shavings, substitute a different add-in or change the ice cream altogether. However you make it, I promise it will be delicious. Enjoy! <3

KitKat Ice Cream Torte

Enough KitKats to cover a 9x9" pan, cut into fourths
1 14-oz can sweetened condensed milk
1 tablespoon butter
1/4 cup sweetened cocoa powder or hot chocolate mix
1 pint vanilla ice cream
1/2 cup chocolate shavings

Cover the bottom of a 9x9" pan with the chopped KitKats.
In a large microwave-safe bowl, combine the sweetened condensed milk, butter, and cocoa. Microwave for 2 minutes, stir, 2 minutes, stir. Continue microwaving in 1-minute increments, stirring inbetween, until the mixture reaches the consistency of a caramel sauce: too thin to scoop, but too thick to drizzle easily. Pour over KitKats and put pan in the fridge until cool.
Soften the ice cream by microwaving for 15 seconds or leaving out at room temperature for a while. Stir in the chocolate shavings and spread the ice cream over the chocolate layer. Freeze until serving, at least an hour.

Sunday, August 12, 2012

Pineapple Coconut Trifle

Here in Brazil, there are a few desserts they are really crazy about. One is trifles- they like to later just about any sort of sweet things in a dish, and somehow it always works out. Another dessert they love is brigadeiro- a chewy chocolate truffle made simply of sweetened condensed milk and cocoa powder that is cooked, cooled and rolled into balls coated with chocolate sprinkles. These brigadeiro have many variations- I recently tried a delicious salted caramel one- among them brig a white brigadeiro. It is made by omitting the cocoa powder and simply cooking down sweetened condensed milk. I like to make this easier by doing it in the microwave!
This dessert, which I got my aunt to teach me how to make, combines a trifle with brigadeiro. Instead of rolling the white brigadeiro into balls, it is made a bit thinner and layered with pineapple and coconut shavings. It is the perfect combination of classic tropical flavors. The chewy coconut, juicy pineapple and creamy brigadeiro pair together very well. The one above was made with just one layer of each, but it is even better with two. Double layers of all the delicious flavors make it a classic Brazilian dessert that can, and should, be made everywhere. Enjoy!

Pineapple Coconut Trifle

1/2 of a pineapple, cut into very small pieces (you can also buy crushed pineapple and drain it)
2 14-oz. cans sweetened condensed milk
2 tablespoons butter
1 cup shredded coconut (we used fresh, but you can used dried if you can't find fresh)

In a large microwave-safe bowl, combine the sweetened condensed milk with the butter.
Microwave for 2 minutes, stir, another 2 minutes, stir. Microwave in 1-minute increments, stirring inbetween, until the mixture reaches the point of a caramel sauce- not thick enough to scoop but not thin enough to drizzle easily.
Layer half of the chopped pineapple in a glass dish- a 2-quart one will do. Cover with half of the milk/butter mixture and then half of the coconut. Repeat the three layers.

Saturday, July 14, 2012

Creamy Brazilian-Style Flan (Pudim de Leite Condensado)

My parents and I recently had dinner at a Cuban restaurant near our house. The food was great, but the dessert was what stuck in our minds. We ordered the Cuban-style flan, and it was the creamiest flan we had ever tasted. It was almost like eating a thick pastry cream, only so much better. After the first bite, my mom and I knew we had to recreate it.
We asked the waitress what was in it, and she mentioned evaporated milk. The flan was very much like the custard we eat all the time in Brazil, but creamier, so we decided to use a traditional Brazilian recipe but swap in evaporated milk for regular. Although it is not traditional, we also added in a little bit of vanilla, which you can't make out distinctly but adds to the overall flavor.
It ended up working out so well. The flan was delicious, very much like the one we had at the restaurant. It combined the creaminess of the Cuban flan with the burnt-sugar taste and slightly spongy texture of the Brazilian, and was just what we had hoped for.
We cooked ours in a special Brazilian flan pan, which is a flan mold over a saucepan of the same size, which has simmering water in it. The instructions I have included are for baking it, but if you have a pan that fits over one of your saucepans and has a lid, by all means, do use it.
Enjoy! <3
Creamy Brazilian-Style Flan (Pudim de Leite Condensado)

6 tablespoons granulated sugar
6 tablespoons water
2 14-oz cans sweetened condensed milk
2 14-oz cans evaporated milk
6 eggs
1 teaspoon vanilla extract

Preheat the oven to 350 F.
In a very clean standard tube/bundt cake pan (one without a design or pattern), mix together the water and granulated sugar. Place the pan over a direct flame and stir the mixture until it darkens into a honey-colored caramel. Remove from heat and tilt the pan so that the caramel covers the sides as well as the bottom of the pan.
In a blender or food processor, combine the sweetened condensed milk, evaporated milk, eggs, and vanilla. Blend only until no streaks remain.
Pour the mixture into the caramel-lined tube pan. Place the tube pan into roasting pan with a dishcloth in the bottom (to prevent the pans from rattling against each other in the oven). Place the two pans into the oven and pour in about two inches of warm water.
Bake for about 40 minutes, or until a knife inserted into the custard comes out with only a few streaks and it still jiggles slightly when moved. Refrigerate for at least two hours before unmolding onto a plate. Refrigerate until serving.

Sunday, October 9, 2011

Pão de Queijo


Also known as Brazilian Cheese Rolls. Also known as the most delicious balls of cheesy yumness you will ever eat.
My mom comes from Minas Gerais in Brazil, and if you ever drop by someone's house for a visit, you won't leave without being served warm pão de queijo. These are little puffs made of cheese and manioc (yucca) flour, and they are chewy and delicious! This is one of those dishes where everyone's grandma has their own special way of making them, and this is my grandma's recipe. It's a pretty typical one, and easy to make, so my mom and I decided to make it yesterday and teach you all how to do it too!
This recipe is soo much easier to make with two people, because you are going to stick your hands in the dough and make a mess (and who wants to do something that is that much fun by themselves??) Here we go...

You start with a big bowl. Our flat wooden one is actually special for making these, but any large bowl will do.

Here is the Brazilian yucca flour we use. This is hard to find outside of Brazilian supermarkets, but I've been told that you can substitute tapioca starch just fine. You mix 5 cups of this...

...with just under a tablespoon of salt...

...in the big bowl. Using your hands, make a large well in the center.

Now take a cup of water and a cup of oil. We use vegetable oil, but soy or canola works fine too.

Heat the liquids in a small saucepan until boiling.

Here's where it gets a little tricky. You want to pour about half of the oil in to the well...

... and mix it in using your hands. CAREFUL, the oil is BOILING. You can start the mixing with a wooden spoon if it's just too hot to handle, but try to do as much as possible with your hands. Then mix in the second half of the oil, also using your hands as much as possible. You want to incorporate all of the oil and really kneed the dough - this is what gives the rolls their great texture.

After kneading, the dough should have this texture. It is moist but still grainy.

Then you're going to need 5 eggs. Mix these in one at a time, still using just your hands.

The dough will look like this after all the eggs are added.

Then it's time for the cheese. Usually a special Brazilian cheese is used, but we decided to try using Pecorino Romano, because it's the closest to the one traditionally used. It ended up working out great.

Shred about 5 cups (loosely packed) of it. I think if anything has 5 cups of cheese, you know it's going to be good...

Mix it in with your hands!

Now it's time for the final step. You need 1 1/2 cups of cold milk (I know this only shows one cup, we added more to it later).

Mix it in gradually, still using your hands. Be warned, this dough is EXTREMELY sticky (this is where doing it with someone else comes in handy - one person pours while the other mixes).

It should look like this after all the milk is mixed in. Now it's time for rolling!
You want to oil your hands to keep the dough from sticking to them, and make small even balls. We used a small cookie scoop (1.5 tbsp) to measure it out. This recipe will make about 75, and they freeze really well. We like to flash-freeze the rolled balls (freeze them on a baking sheet and then put them in bags) so we can defrost them whenever we want, but feel free to bake them like this too (but spread them out more than we did - they are close together just for the flash-freezing).
Warm up the oven to 350 F...

...and stick them in there for 30 minutes, or until just starting to brown (the time is about the same for the frozen or room temperature ones). Smelling good...

Yum! They are best eaten when still warm.

This is what they look like in the middle. Don't worry, they are fully cooked - they are supposed to be moist and chewy like this.

The best part of this for my mom is, these are naturally gluten-free!
These are great on their own, or with a cup of coffee, but there are a few things you can do with them too. Brazilians like to make little ham sandwiches. Here at home we like sandwiching them with something sweet - dulce de leche or jam is great. We had some with fig jam, which was delicious.
Please please please go try these if you like anything cheesy... or chewy... or really if you want to try something new that is super delicious! Let me know how it goes :)
Enjoy!!!

Thursday, September 3, 2009

Coca-Cola Cake with Brigadeiro Frosting


This weekend was my cousin's eighth birthday. My aunt always makes the same cake for her birthday, which is her favorite: Coca-Cola cake with brigadeiro frosting. It is really good, so I asked her to teach me to make it. Brigadeiro is a brazilian candy (the totally brown ones next to the cake). It is made from sweetened condensed milk cooked with sweetened cocoa powder until thick, and then rolled in chocolate jimmies. I'll post the recipe for the candies some time, so you can make those, too. The frosting is a thinned version of the candy. The cake is a large recipe, so I make a lot of the brigadeiro, too, but if you want to frost a smaller cake, you can easily scale it down. 
This is a nice recipe for a kid's birthday, because you can make them guess what the secret ingredient is in the cake :D We decorated the top with star sprinkles in the shape of a heart surrounded by chocolate jimmies. Have fun!

Coca-Cola Cake 
Ingredients:
2 1/2 cups sugar
5 eggs, separated 
1 pinch salt
1 cup (2 sticks) butter, at room temperature
3 cups all-purpose flour
1 cup sweetened cocoa powder
1 tablespoon baking powder
1 can coke (original), at room temperature

Instructions:
Preheat oven to 350 F. Grease and flour two 9 by 13 baking pans. 
Beat the sugar, salt and egg yolks well, using an electric mixer. 
Add butter and beat until almost white.
Add coke and flour slowly, alternating between the two, using a spatula (NOT the electric mixer).
Add the sweetened cocoa powder and then the baking powder. Beat the egg whites to stiff peaks, and then fold in to the mixture. 
Divide batter between the two pans and bake for about 20 minutes, or until done.
Let cake cool before making frosting.

Brigadeiro Frosting
Ingredients:
3 cans sweetened condensed milk
9 heaping spoons sweetened cocoa powder
2 tablespoons butter

Instructions:
Combine in a microwave-proof dish. Heat for 2 minutes, stir, 2 minutes, stir. Heat in 1 minute intervals or until thickened but still easily pourable and spreadable. 

Assembly:
Cut each layer of cake in half so that you have four 9 by 13 inch layers. Fill and frost with brigadeiro frosting, working with the frosting still hot. If it cools, it will become too thick. Decorate as desired.


Saturday, October 4, 2008

Tropical Dulce de Leche Cake


Two weeks ago, my parents and I were invited to go have dinner at some friends' house. My mom, as always, volunteered to bring dessert. Then she came to me, saying that she had thought of a cake recipe based on a Brazilian dessert. 
Here's the recipe:
1 9x13" white sheet cake
1 recipe buttercream frosting
1 jar dulce de leche
1 can crushed pineapple
sweetened coconut shavings (the kind you get in bags at the grocery store)

First, cut the cake into two layers and then in half. Put one quarter of the cake on your cake board. Put one layer of dulce de leche on. Put another quarter of the cake on top, then a layer of crushed pineapple. Then the third quarter and another layer of dulce de leche. Put on the final layer and cover the entire cake with buttercream. Before the buttercream hardens, pat the coconut all over. Makes 20 servings.