Tuesday, February 7, 2012

TWD: White Loaves


This is a quick post, as I am super busy tonight. This is the first ever recipe for the new book, Baking with Julia!! I am super excited to be in this group! It was chosen by the great girls at Slush and Someone's in the Kitchen.
This was a fairly simple recipe, and probably the most successful bread I've ever made (not that I've made many). I added in a little cinnamon sugar swirl with butter when I was rolling it up. This was delicious as toast, and I will make it again in the future if I want a simple white loaf. If using the cinnamon swirl bread and wanting to eat it plain, I would recommend adding in a little more sugar to the actual dough - it was a little bland, but did have a great texture. I'm sure it would be delicious with raisins as well.
Enjoy!

Friday, February 3, 2012

Pumpkin Cheesecake


Oh. My. God. How is it that I have been baking for years, and had never tried this until this past Thanksgiving?
As you can probably guess, I spend quite a lot of time searching through my favorite blogs and cooking websites looking for recipes. People always made pumpkin cheesecake around fall, and I always thought it looked SO good! This past October, we went out for dinner to an Italian restaurant in the neighborhood. We were with some guests from Brazil who had never had cheesecake before, so of course we decided that we had to order them a slice. When we asked the waitress, she said that they had just gotten their pumpkin cheesecakes. It was meant to be! :)
When it came time to plan the desserts for Thanksgiving, I decided that instead of pumpkin pie (we always do one pumpkin, one pecan, and one apple), I was going to make a pumpkin cheesecake. My dad, the pumpkin pie lover in the family, "reluctantly" agreed. I turned to a valuable source: Food Network! This recipe was so easy and quick, which is great, especially when there are so many other things to be made. I made it gluten-free for my mamma by substituting gluten-free shortbread for the graham cracker crumbs. It was delicious! Don't tell anyone, but I may have had it for breakfast the next day... shh...
It may be past Thanksgiving and Christmas, but no time is wrong for pumpkin desserts. Enjoy!

Pumpkin Cheesecake (from Food Network)
Ingredients
Crust:
1 3/4 cups graham cracker crumbs
3 tablespoons light brown sugar
1/2 teaspoon ground cinnamon
1 stick melted salted butter
Filling:
3 (8-ounce) packages cream cheese, at room temperature
1 (15-ounce) can pureed pumpkin
3 eggs plus 1 egg yolk
1/4 cup sour cream
1 1/2 cups sugar
1/2 teaspoon ground cinnamon
1/8 teaspoon fresh ground nutmeg
1/8 teaspoon ground cloves
2 tablespoon all-purpose flour
1 teaspoon vanilla extract

Directions
Preheat oven to 350 degrees F.

For crust:
In medium bowl, combine crumbs, sugar and cinnamon. Add melted butter. Press down flat into a 9-inch springform pan. Set aside.

For filling:
Beat cream cheese until smooth. Add pumpkin puree, eggs, egg yolk, sour cream, sugar and the spices. Add flour and vanilla. Beat together until well combined.

Pour into crust. Spread out evenly and place in oven for 1 hour. Remove from the oven and let sit for 15 minutes. Cover with plastic wrap and refrigerate for 4 hours.


*As you will notice if you click on the link, this is a Paula Deen recipe. Trust me, I know all about the whole diabetes scandal, but honestly, who cares what she decides to keep private? Yes, most of her recipes are full of fat, but no one said her show was meant to be about healthy eating. This recipe = yum!

Wednesday, January 25, 2012

BFMHTY: Almost Fudge Gateau


I apologize for the picture above... don't even get me started on my digital camera and its "food setting." Last night for dinner, my dad and I decided to make a special meal for my mom. Chocolate is her favorite, so I looked through the way-too-long list of recipes I haven't made from BFMHTY. Like I said earlier, I no longer have the goal of finishing the book, but I like the recipes from it and maybe it's something I'll want to do someday. I think it would be a fun summer project (although it might last two summers - seriously, the length of this list is depressing).
Anywho, I chose the almost fudge gateau. That name makes it sound delicious, and I love the little story before the recipe about Dorie's friend who gave up television to sit and watch her oven for half an hour while the cake rose. This cake was fairly simple (you know, for a master baker like me. yeah right, this is the girl who managed to make whipped cream into butter). Haha no, it is not a complicated recipe and is fairly quick.
The cake is, like the description says, moist and dense. It is very rich and chocolaty, and delicious! I recommend it. The recipe can be found in BFMHTY.
<3

Monday, January 23, 2012

Mini Cheesecakes and a new plan


This is another recipe I made for our New Year's party. I loved it! It's super simple and anyone (I mean anyone, even if you NEVER bake) can make it. It starts off with mini cupcake wrappers. You put a nilla wafer in the bottom of each one. I have made these like this before with success, but this time I just put some cookie crumbs in the bottom of each one because I wanted to make them gluten free, and I couldn't find gluten-free cookies that small. Over the "crust" comes a simple mixture of cream cheese, eggs, vanilla, and sugar (of course. what blog do you think you're reading??). They are baked for a few minutes and then topped with some sort of sweet deliciousness. I have made them with canned cherry pie filling like the recipe calls for, but this time I put a dollop of raspberry jam on top. They were delicious, and my best friend and I had fun making them. They are a great project to do with little kids, or just for a quick dessert. Enjoy!!

Mini Cheesecakes (from Allrecipes)
Ingredients
1 (12 ounce) package vanilla wafers
2 (8 ounce) packages cream cheese
3/4 cup white sugar
2 eggs
1 teaspoon vanilla extract
1 (21 ounce) can cherry pie filling

Directions
Preheat oven to 350 degrees F (175 degrees C). Line miniature muffin tins (tassie pans) with miniature paper liners.
Crush the vanilla wafers and place 1/2 tablespoon of the crushed vanilla wafers into the paper lined miniature muffin tins.
Cream together with an electric mixer the cream cheese, sugar, eggs and vanilla. Fill each miniature muffin liner with this mixture, almost to the top.
Bake at 350 degrees F (175 degrees C) for 15 minutes. Cool and then top with a teaspoonful of cherry (or any other flavor) pie filling.


Now for the new plan. Remember when I was in Tuesdays with Dorie? I loved being in that group, and it motivated me to bake new things more often. Last year I had to drop out due to lack of time, and I just heard that they are starting a new book. I'm joining in again, SO here's my new plan:
I want to keep baking from BFMHTY. Sometimes. I love that book and it has been something I do for the past 2 years, but I realized that since I joined so late in, I'm not even halfway through with it. I love the recipes from it but don't want to have the goal of finishing it anymore. Maybe someday!
I bought Baking with Julia. I joined the new group! I'm not sure how far this will go - doing one every two weeks is definitely more manageable, so I think it will work out better this time. I'm excited to start from the beginning of a book with that group.
I may try to take up Daring Bakers again. I will keep looking at their challenges each month (somehow they still haven't kicked me out - I guess they don't check who posts each month), and I'll try to do them sometimes. I think this way I'll learn how to make things I wouldn't have otherwise. But no pressure on this one - baking new things isn't something I want to feel like I have to do.
So that's my plan. I hope you keep reading my blog, and follow along whatever crazy baking adventures I go on. <3

Sunday, January 8, 2012

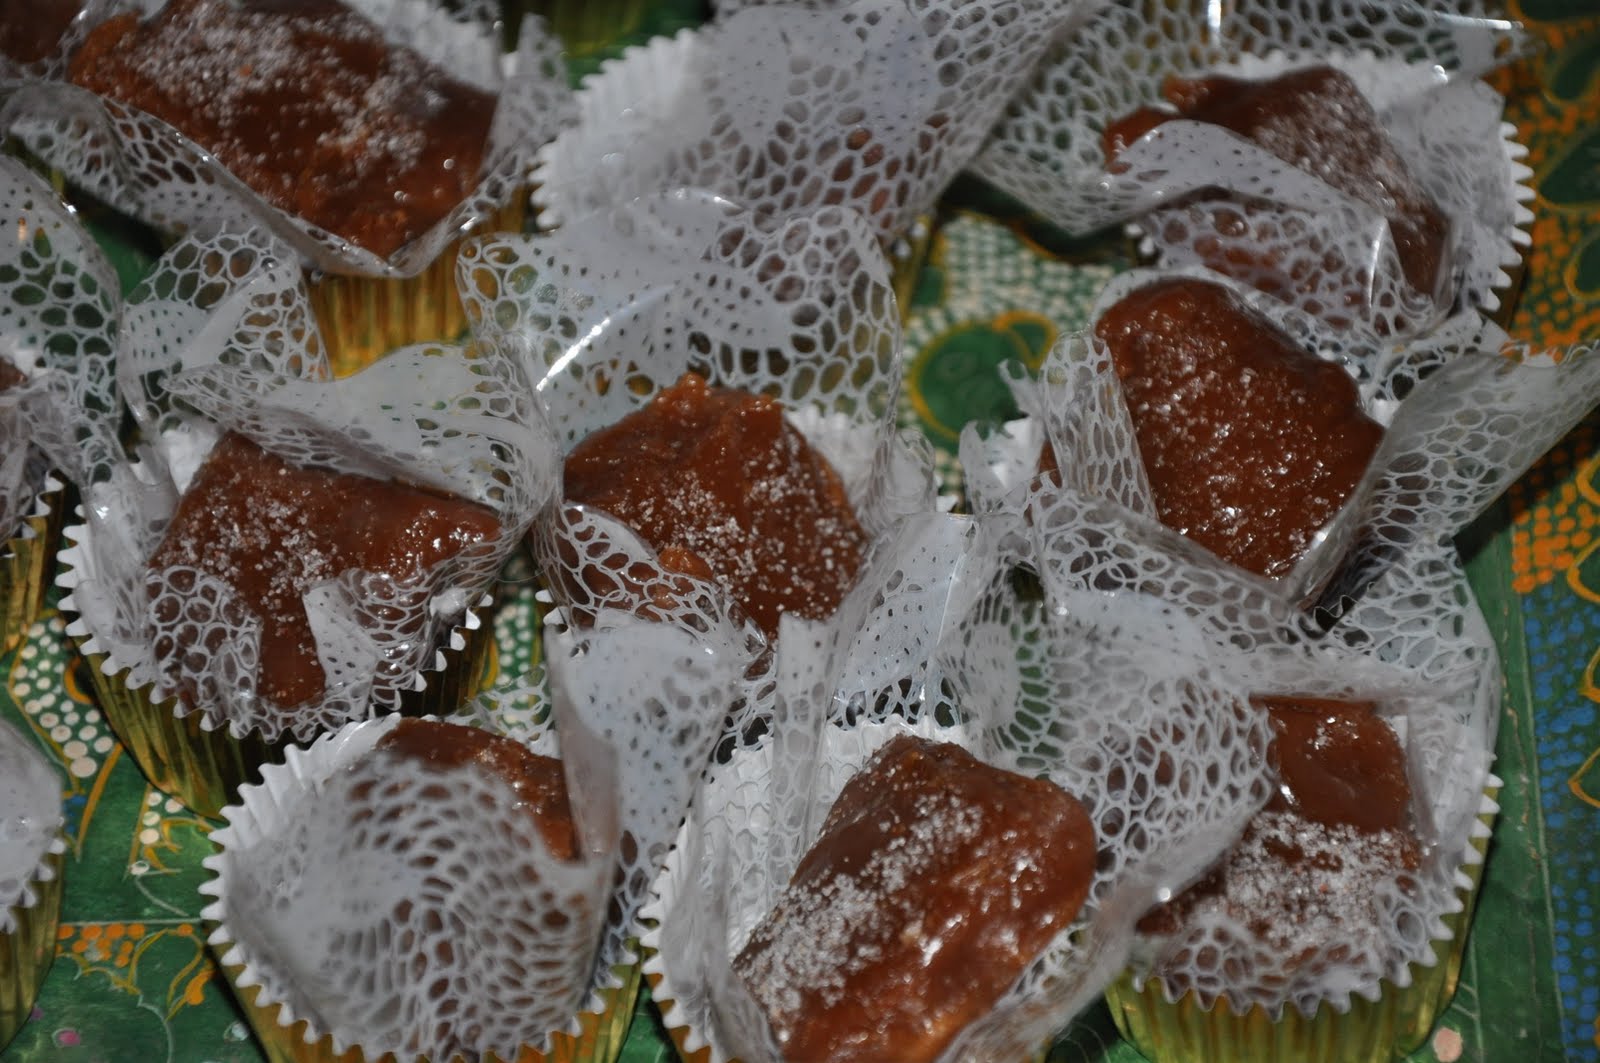
Sea Salt Caramels and a cute appetizer


Happy New Year!! Last weekend we had a small party at our house on the 31st. We decided to make dinner be a whole bunch of appetizers instead of having a big sit-down ordeal, and it worked out great. I was in charge of dessert and decided to keep with the theme of bite-sized food and make various little sweets. I made a variety, and these were probably the most popular; sea salt caramels. I had never made caramel before but it was something I always wanted to try, so I was glad to have the chance. The recipe says that it will take about ten minutes for the sugar to turn a dark honey color, but mine took about eight, so I guess it depends on the stove/pan. I cut them just as soon as they were cool and they were EXTREMELY chewy and could pull out a tooth, but once it was time for dessert a few hours later they had softened and were perfectly chewy and delicious. I had no flakes of sea salt so I used regular table sea salt (less than a tablespoon though) and they were a bit too salty - I would stick to the flakes. Either way everyone loved them, and they were a definite hit!
Homemade Sea Salt Caramels (source: Baking Bites)
1/3 cup water
1/4 cup corn syrup
1 1/2 cups sugar
1 cup heavy cream
1/4 cup unsalted butter
1/2 tsp salt
1 – 2 tbsp sea salt (rec. Maldon brand)

Lightly grease a 9×9 -inch glass or pyrex baking dish with butter or a thin coat of vegetable oil.
In a large saucepan, combine water, corn syrup and sugar. Bring to a boil over high heat, then continue to boil until caramel turns a deep honey color (10-14 minutes).
While sugar cooks, combine cream and butter in a microwave-safe bowl and cook for 1-2 minutes on high heat, until butter is melted. Set aside.
When sugar is a deep honey color, pour in cream mixture. Caramel will bubble up vigorously. Stir until bubbles subside slightly, then stir in salt. Attach a candy thermometer to the side of the pan and continue to cook, stirring regularly with a silicone spatula, until caramel reaches 260F (5-10 minutes).
Pour caramel into prepared dish. Allow caramel to cool completely, then sprinkle evenly with sea salt.
Cut caramels into small squares or rectangles with a warm, sharp knife.
Caramels can be served immediately or wrapped in small squares of wax paper. Caramels will keep for a few weeks at room temperature.
Makes about 3-4 dozen, depending on the size of your caramels. <-- i cut mine into 36 and they were pretty large


This was one of our appetizers, and I thought it was such a cute idea. You just put little balls of fresh mozzarella (we couldn't find them so we just cut chunks) and cherry tomatoes on toothpicks, and set them out with a bowl of pesto for dipping. We made it ourselves using this recipe, which was delicious, and we added a little extra oil to make it thinner for dipping. (The little bowl is garlic-free for a friend who's allergic). Yummy!

Enjoy!!

Saturday, December 10, 2011

Dorie's Tarte Noir


Sorry I've been gone! Soo busy with school and trying to find time to be with friends. Oh well! A while ago I made Dorie's Tarte Noir, which was AMAZING. I made it gluten-free for my mommy! It was really easy to do - I just substituted the flour in the crust for all-purpose gluten-free flour, and added a little xanthan gum. I couldn't tell that it was different from the original recipe at all.
The ganache is very rich, but so good. My mom was happy with it, and she insisted on being the food stylist and photographer for the picture :)
Enjoy!

Friday, November 11, 2011

Vegan Chocolate Cupcakes


Sometimes the simplest things are the best. Warm blankets, fuzzy sweaters, and chocolate cake of course. My best friend and I were in the same math class last year. One day it was our friend's birthday, and we decided to make cupcakes for the class to celebrate. After having them once, the class became obsessed, and we became the official cupcake bakers. My friend's mom gave us a great recipe that happens to be vegan, but it also happens to be the best chocolate cake recipe I've ever used. The cake is moist and delicious. We always made these with a simple buttercream, leaving it off for our friend who can't have dairy.
Towards the end of the year, we were bringing in cupcakes nearly every week. If it wasn't a friend's birthday, we would find an excuse - some weird holiday, or a celebrity's birthday. It was always the same recipe - the only difference was that we would dye the icing a different color every week. We kept it simple. We once tried bringing in vanilla cupcakes (for my birthday), but they just weren't as good and we decided to stick to these.
I switched schools this fall when we started high school, but my best friend stayed at my old school. I still see her every weekend, but I miss those afternoons baking cupcakes for math class. A few weeks ago, she said she had volunteered to bring in cupcakes for a class, so we decided to make them together. Our old recipe, nice and simple. Yum.

Dairy-Free Chocolate Cake (from The Joy of Cooking)
Whisk together in a large bowl until well blended:
1 1/2 cups all-purpose flour
1 cup plus 2 tablespoons sugar
1⁄3 cup plus 1 tablespoon unsweetened cocoa powder
1 teaspoon baking soda
1⁄2 teaspoon salt
Add:
1 cup cold water
1⁄4 cup vegetable oil
1 tablespoon distilled white vinegar
2 teaspoons vanilla
Whisk until smooth. Scrape the batter into the pan and spread evenly.
Bake about 30 minutes, until a cake tester inserted in the center comes out clean. Let cool in the pan on a rack for 10 minutes. Slide a thin knife around the cake to detach it from the pan. Invert the cake and peel off the paper liner, if using. Let cool right side up on the rack.
*One recipe makes about 12 cupcakes - we always double it. Bake the cupcakes for about 15 minutes - check on them until a skewer inserted in the middle comes out clean.

Quick Buttercream Frosting (from Baking Bites)
1 cup butter, room temerature
2 tsp vanilla extract
4 cups confectioners’ sugar (approx. 1 lb.)
2-4 tablespoons milk

Cream butter with an electric mixer until soft. Add vanilla and gradually add in sugar until most has been incorporated. Mixture will look a bit sandy. Add in milk as necessary (start with 2 tbsp), along with any remaining sugar, until frosting reaches an easy to work with consistency.
*This frosting is so good, we eat it by the spoonful. Our teacher loved it so much, she asked us to bring in whatever was leftover for her. So every week, she got her own little tub of frosting. She says she used it as a dip for pretzels. Yum.