I finally, finally made great macarons. I had made pretty good ones before, but these were on a whole different level. They were perfectly chewy with a nice crisp shell from sitting on the baking sheet for an hour before going into the oven.
My friend and I had some issues getting the Swiss meringue to stiff peaks after adding the sugar; it took us a good 10 minutes to get there. I also found it interesting that instead of aging the eggwhites, this recipe gives the option of microwaving them for 8 seconds. I was skeptical, but eventually it worked, and we were ridiculously excited when we saw these come out of the oven.
We filled lots of them with vanilla filling. I tried to use an Italian meringue recipe, but we had some more issues with the meringue, and it just didn't taste all that great (my fault for using salted butter accidentally), so we had to add some powdered sugar as a thickener/sweetener. I'll save the filling recipe for when I've worked on it some more...
We also filled lots with nutella. These were definitely the overall favorites - the vanilla bean in the macarons went perfectly with the chocolatey hazelnut spread.
We added sugar pearls to the sides of one (I had seen this done on a blog and thought it was beautiful) before deeming it too time-consuming to do to all of them. It was so cute though! The little pearls looked perfect with the Tiffany blue color we chose. I promise that they did actually look Tiffany blue - I just wasn't able to get it to come through in the pictures.
I'm so happy I found this recipe and was finally able to make a great macaron - my next task is the salted caramel flavor! Any helpful tips?
Enjoy! <3
Vanilla Bean Macarons
(from Baker Chic)
110 grams blanched slivered almonds or ground almond flour
200 grams confectioners sugar
100 grams egg whites (from 3 eggs, separated 24 hours in advance or microwaved for 8 seconds)
1/4 tsp vanilla paste or extract
1 vanilla bean, split lengthwise
50 grams granulated sugar
filling of choice
Pulse the almonds/almond flour and confectioner's sugar several times in your food processor until thoroughly mixed. Place egg whites in a clean bowl and beat using mixer (or whisk) until soft peaks form. Split and scrape the vanilla pod and add the beans and extract to the egg whites. Add the sugar and turn the mixer to high, whisking until you have a glossy meringue with stiff peaks. (It was at this point that we folded in a couple of drops of gel food coloring.)
Fold the dry ingredients into the egg whites gently, briskly at first to break up the meringue a bit, until thoroughly mixed. It's important you don't over-mix the batter, but it should be well combined and is supposed to "ribbon" off the the spatula when lifted from the bowl.
Transfer the batter to a piping bag fitted with a large round tip or a zip-lock bag with one of the tips cut off and pipe rounds of 1.5 inches along two parchment or silicon-lined baking sheets (leaving space between each.) Let sit one hour at room temperature to develop a shell.
Heat oven to 300 F. Bake for 10-12 minutes. Cool for a couple of minutes and gently remove from the pan.
To fill, match up like sized cookies and pipe with filling of choice.
Sunday, July 29, 2012
Friday, July 27, 2012
TWD Rewind: Brown Sugar Bundt Cake
The picture above is bad. I know. It's actually from about four years ago, when I first decided to join Tuesdays with Dorie. I believe they were about halfway through the book, and I was so excited that before even making the first chosen recipe, I decided to do some rewinds. This was one of those, and it was so good that even years later, I still remember it.
This cake is so fluffy, filled with moist raisins and chunks of pear. It falls apart if you try to eat it 10 minutes out of the oven, like we did, but is so worth it. The recipe can be found here or in the book.
For the past couple of years, I've been trying to finish every. last. recipe. in the book. I recently realized just how many are left, and that it's become more of a chore than a fun way to entertain myself and create yummy treats. I've had so much fun in the past few months picking recipes from wherever I want to (and still doing the current TWD), that I've decided to give up on my original goal of finishing every recipe in BFMHTY. It will take me years to finish at this point, and it's not worth it - I might to back to it at some point, though. For now, I'm just enjoying having "recipe freedom" and the current TWD.
<3
This cake is so fluffy, filled with moist raisins and chunks of pear. It falls apart if you try to eat it 10 minutes out of the oven, like we did, but is so worth it. The recipe can be found here or in the book.
For the past couple of years, I've been trying to finish every. last. recipe. in the book. I recently realized just how many are left, and that it's become more of a chore than a fun way to entertain myself and create yummy treats. I've had so much fun in the past few months picking recipes from wherever I want to (and still doing the current TWD), that I've decided to give up on my original goal of finishing every recipe in BFMHTY. It will take me years to finish at this point, and it's not worth it - I might to back to it at some point, though. For now, I'm just enjoying having "recipe freedom" and the current TWD.
<3
Wednesday, July 25, 2012
Thick and Creamy Lemon Bars
Lemon bars are one of those quintessential bakesale treats. Available at just about every elementary school fundraiser, they never fail to please. While second graders will usually head straight to the colorful cupcakes and rice krispie treats, some of the older customers will be sensible and go to the lemon bars!
The problem with lemon bars is that they are often either too sour, from too much lemon juice, or much too sweet, with lots of unnecessary sugar. This recipe finds the perfect balance - the crust is crumbly and sweet, and the filling is tart but not overly so. It has lots of lemon zest, which creates a nice strong flavor.
The balance between the filling and crust in these bars is very nice. There is plenty of filling, but if you like a larger crust-to-filling ratio, feel free to reduce the lemon layer. If you ever are involved in a bake sale, be sure to take these; the people smart enough to choose them will thank you.
Enjoy! <3 Thick and Creamy Lemon Bars
(from Smitten Kitchen)
For the crust:
1 cup (2 sticks) unsalted butter, at room temperature
1/2 cup granulated sugar
2 cups flour
1/8 teaspoon kosher salt
For the lemon layer:
6 eggs, at room temperature
2 1/2 cups granulated sugar
2 tablespoons grated lemon zest (4 to 6 lemons)
1 cup freshly squeezed lemon juice
1 cup flour
Confectioners’ sugar, for dusting
Preheat the oven to 350 F and grease a 9 x 13 inch baking pan.
For the crust, cream the butter and sugar until light in the bowl of an electric mixer fitted with the paddle attachment. Combine the flour and salt and, with the mixer on low, add to the butter until just mixed. Dump the dough onto a well-floured board and gather into a ball. Flatten the dough with floured hands and press it into the greased baking sheet, building up a 1/2-inch edge on all sides. Chill.
Bake the crust for 15 to 20 minutes, until very lightly browned. Let cool on a wire rack. Leave the oven on.
For the lemon layer, whisk together the eggs, sugar, lemon zest, lemon juice, and flour. Pour over the crust and bake for 30 to 35 minutes, or about five minutes beyond the point where the filling is set. Let cool to room temperature.
Cut into rectangles or squares (I did some of both) and dust with confectioners' sugar.
The balance between the filling and crust in these bars is very nice. There is plenty of filling, but if you like a larger crust-to-filling ratio, feel free to reduce the lemon layer. If you ever are involved in a bake sale, be sure to take these; the people smart enough to choose them will thank you.
Enjoy! <3 Thick and Creamy Lemon Bars
(from Smitten Kitchen)
For the crust:
1 cup (2 sticks) unsalted butter, at room temperature
1/2 cup granulated sugar
2 cups flour
1/8 teaspoon kosher salt
For the lemon layer:
6 eggs, at room temperature
2 1/2 cups granulated sugar
2 tablespoons grated lemon zest (4 to 6 lemons)
1 cup freshly squeezed lemon juice
1 cup flour
Confectioners’ sugar, for dusting
Preheat the oven to 350 F and grease a 9 x 13 inch baking pan.
For the crust, cream the butter and sugar until light in the bowl of an electric mixer fitted with the paddle attachment. Combine the flour and salt and, with the mixer on low, add to the butter until just mixed. Dump the dough onto a well-floured board and gather into a ball. Flatten the dough with floured hands and press it into the greased baking sheet, building up a 1/2-inch edge on all sides. Chill.
Bake the crust for 15 to 20 minutes, until very lightly browned. Let cool on a wire rack. Leave the oven on.
For the lemon layer, whisk together the eggs, sugar, lemon zest, lemon juice, and flour. Pour over the crust and bake for 30 to 35 minutes, or about five minutes beyond the point where the filling is set. Let cool to room temperature.
Cut into rectangles or squares (I did some of both) and dust with confectioners' sugar.
Tuesday, July 24, 2012
Healthy Honey Zucchini Bread
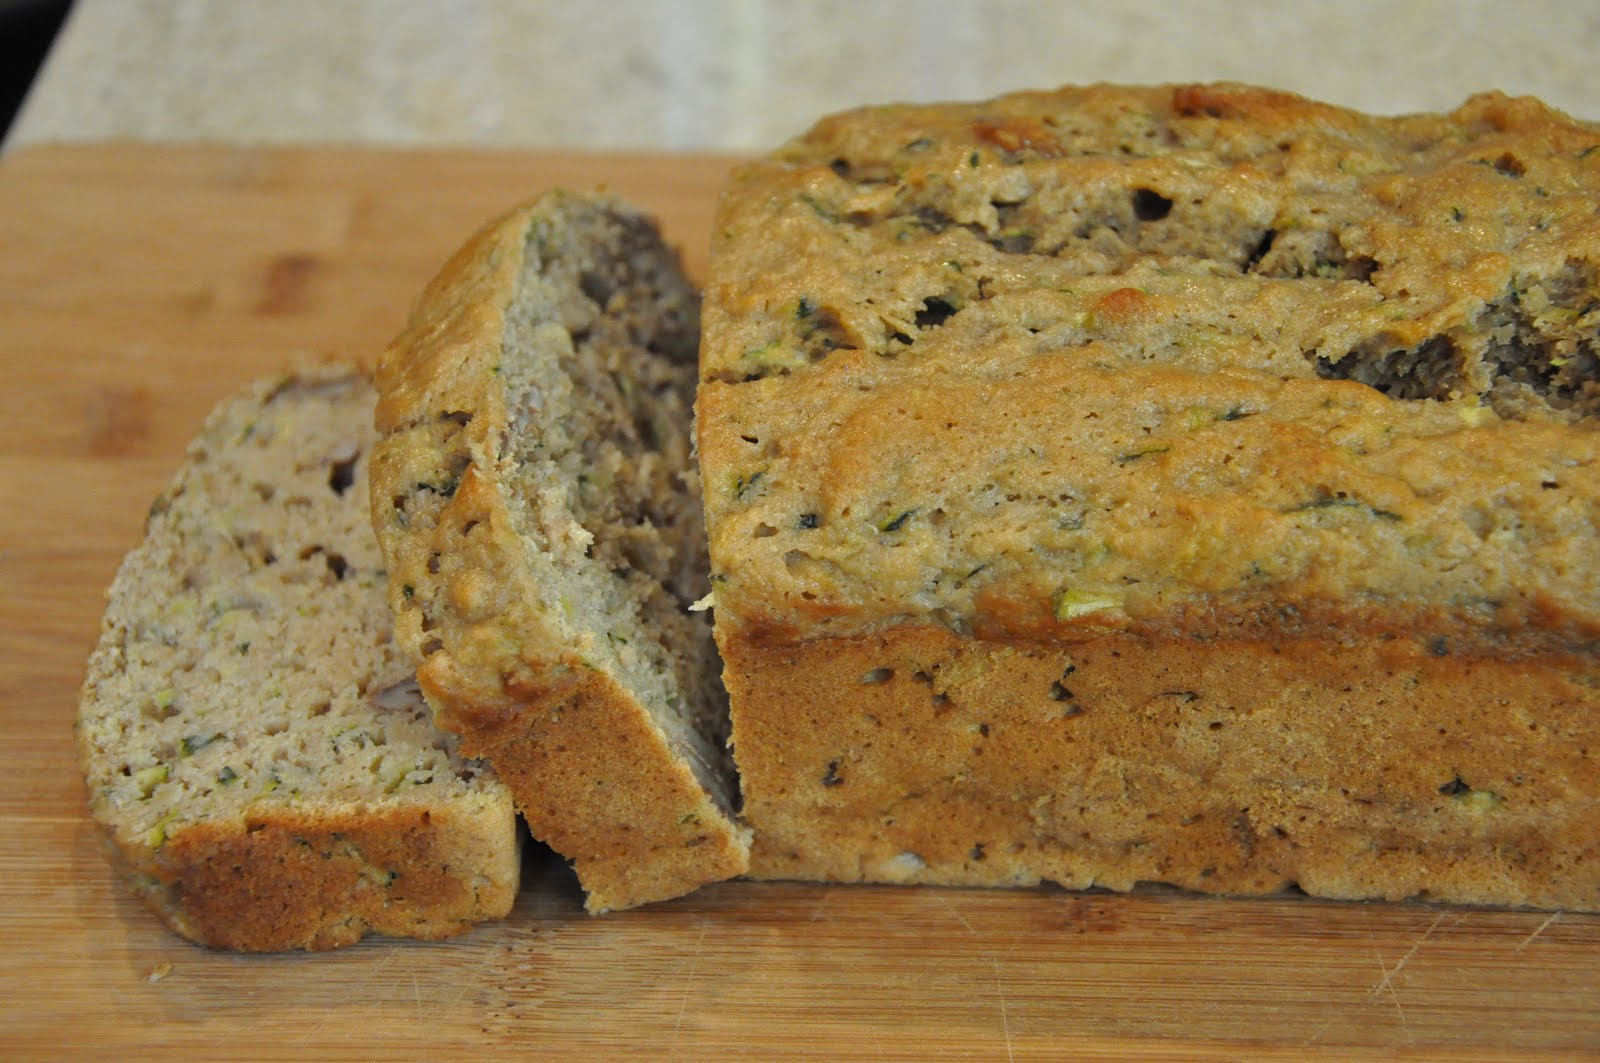
Although it may not seem like it from how many sweets I post, I don't actually just eat cupcakes and pie all day. Most of what I make gets taken to work with my dad to share with his colleagues or given to friends, and I end up having just a bit of it. This week, I wanted to bake something that I could have for breakfast during the week without feeling guilty about starting my day with tons of sugar. I decided to put together a few different zucchini bread recipes and create one that was as healthy as I could make it.
This bread is simple to whip up in the afternoon so that you can have it for breakfast the next day. Or as a snack right after baking it. Or for lunch. Or dinner. You know...
This uses whole wheat flour, pecans (you could also use walnuts), and lots of zucchini, which makes it pretty filling. I substituted honey and applesauce for the usual sugar and oil, making it moist with a hint of sweetness. It didn't come through as sweet as I wanted it to, so I like to serve each slice with a drizzle of honey. If you're looking for a dessert, this isn't it, but this is pretty tasty.
Enjoy! <3 Healthy Honey Zucchini Bread
a little over 1/2 cup milk
2 eggs
a bit over 1/4 cup honey
2/3 cup plain applesauce
2 teaspoons vanilla extract
2 large zucchini, shredded
2 1/2 cups white whole wheat flour
2 teaspoons baking powder
2 teaspoons ground cinnamon
1/2 teaspoon salt
1/2 cup pecans, chopped
2 tablespoons sugar
Preheat oven to 350 F. Oil or butter a 9 x 5 inch loaf pan.
In a medium bowl, whisk together milk, eggs, honey, applesauce, and vanilla. Stir in shredded zucchini. Stir in the flour, baking powder, cinnamon, salt, and pecans just until no streaks remain.
Pour batter into greased loaf pan and sprinkle the top with the sugar. Bake until golden and a skewer or knife inserted in the center comes out clean, about an hour. Cool in the pan for 10 minutes before turning out onto a wire rack. Let cool for at least an hour before slicing, or wrap in plastic wrap and store overnight.
- makes 1 loaf
This uses whole wheat flour, pecans (you could also use walnuts), and lots of zucchini, which makes it pretty filling. I substituted honey and applesauce for the usual sugar and oil, making it moist with a hint of sweetness. It didn't come through as sweet as I wanted it to, so I like to serve each slice with a drizzle of honey. If you're looking for a dessert, this isn't it, but this is pretty tasty.
Enjoy! <3 Healthy Honey Zucchini Bread
a little over 1/2 cup milk
2 eggs
a bit over 1/4 cup honey
2/3 cup plain applesauce
2 teaspoons vanilla extract
2 large zucchini, shredded
2 1/2 cups white whole wheat flour
2 teaspoons baking powder
2 teaspoons ground cinnamon
1/2 teaspoon salt
1/2 cup pecans, chopped
2 tablespoons sugar
Preheat oven to 350 F. Oil or butter a 9 x 5 inch loaf pan.
In a medium bowl, whisk together milk, eggs, honey, applesauce, and vanilla. Stir in shredded zucchini. Stir in the flour, baking powder, cinnamon, salt, and pecans just until no streaks remain.
Pour batter into greased loaf pan and sprinkle the top with the sugar. Bake until golden and a skewer or knife inserted in the center comes out clean, about an hour. Cool in the pan for 10 minutes before turning out onto a wire rack. Let cool for at least an hour before slicing, or wrap in plastic wrap and store overnight.
- makes 1 loaf
Monday, July 23, 2012
Peanut Butter Cupcakes
I wanted cupcakes, but I was sick of making the same old vanilla and chocolate recipes over and over. I was considering a salted caramel cupcake (it would be great if anyone has a good recipe?) when peanut butter came up. Sounded good to me!
I didn't waste a lot of time searching for a recipe: I found the first one that looked good and went to the grocery store! This recipe was perfect. I had never used shortening in cupcakes before, but it gave them a really good texture, and I used butter-flavored shortening so that the buttery flavor wasn't lost. The peanut butter flavor definitely came through in the cupcake but wasn't too strong. These could be frosted with a peanut butter or marshmallow frosting and would be very good, but I decided to top them with this chocolate buttercream. It is my favorite recipe and so easy to make. It paired very well with the peanut butter; this might just be my new favorite cupcake!
Enjoy! <3 Peanut Butter Cupcakes
(from Allrecipes)
2 cups brown sugar
1/2 cup shortening (I used butter-flavored)
1 cup peanut butter
2 eggs
1 1/2 cups milk
1 teaspoon vanilla extract
2 1/2 cups all-purpose flour
1 teaspoon baking soda
2 teaspoons cream of tartar
1 pinch salt
Preheat the oven to 350 F. Line two 12-cup cupcake pans with paper liners, or grease and flour cups.
In a large bowl, mix together the brown sugar, shortening and peanut butter until light and fluffy. Beat in the eggs one at a time, then stir in the vanilla.
Combine the flour, cream of tartar, baking soda and salt; stir into the batter alternately with the milk. Spoon into the prepared muffin cups.
Bake for 15 to 20 minutes in the preheated oven, until the top of the cupcakes spring back when lightly pressed. Cool in the pan for at least 10 minutes before removing to a wire rack to cool completely before frosting as desired.
- makes 24 cupcakes
I didn't waste a lot of time searching for a recipe: I found the first one that looked good and went to the grocery store! This recipe was perfect. I had never used shortening in cupcakes before, but it gave them a really good texture, and I used butter-flavored shortening so that the buttery flavor wasn't lost. The peanut butter flavor definitely came through in the cupcake but wasn't too strong. These could be frosted with a peanut butter or marshmallow frosting and would be very good, but I decided to top them with this chocolate buttercream. It is my favorite recipe and so easy to make. It paired very well with the peanut butter; this might just be my new favorite cupcake!
Enjoy! <3 Peanut Butter Cupcakes
(from Allrecipes)
2 cups brown sugar
1/2 cup shortening (I used butter-flavored)
1 cup peanut butter
2 eggs
1 1/2 cups milk
1 teaspoon vanilla extract
2 1/2 cups all-purpose flour
1 teaspoon baking soda
2 teaspoons cream of tartar
1 pinch salt
Preheat the oven to 350 F. Line two 12-cup cupcake pans with paper liners, or grease and flour cups.
In a large bowl, mix together the brown sugar, shortening and peanut butter until light and fluffy. Beat in the eggs one at a time, then stir in the vanilla.
Combine the flour, cream of tartar, baking soda and salt; stir into the batter alternately with the milk. Spoon into the prepared muffin cups.
Bake for 15 to 20 minutes in the preheated oven, until the top of the cupcakes spring back when lightly pressed. Cool in the pan for at least 10 minutes before removing to a wire rack to cool completely before frosting as desired.
- makes 24 cupcakes
Sunday, July 22, 2012
Black and White Rice Krispies
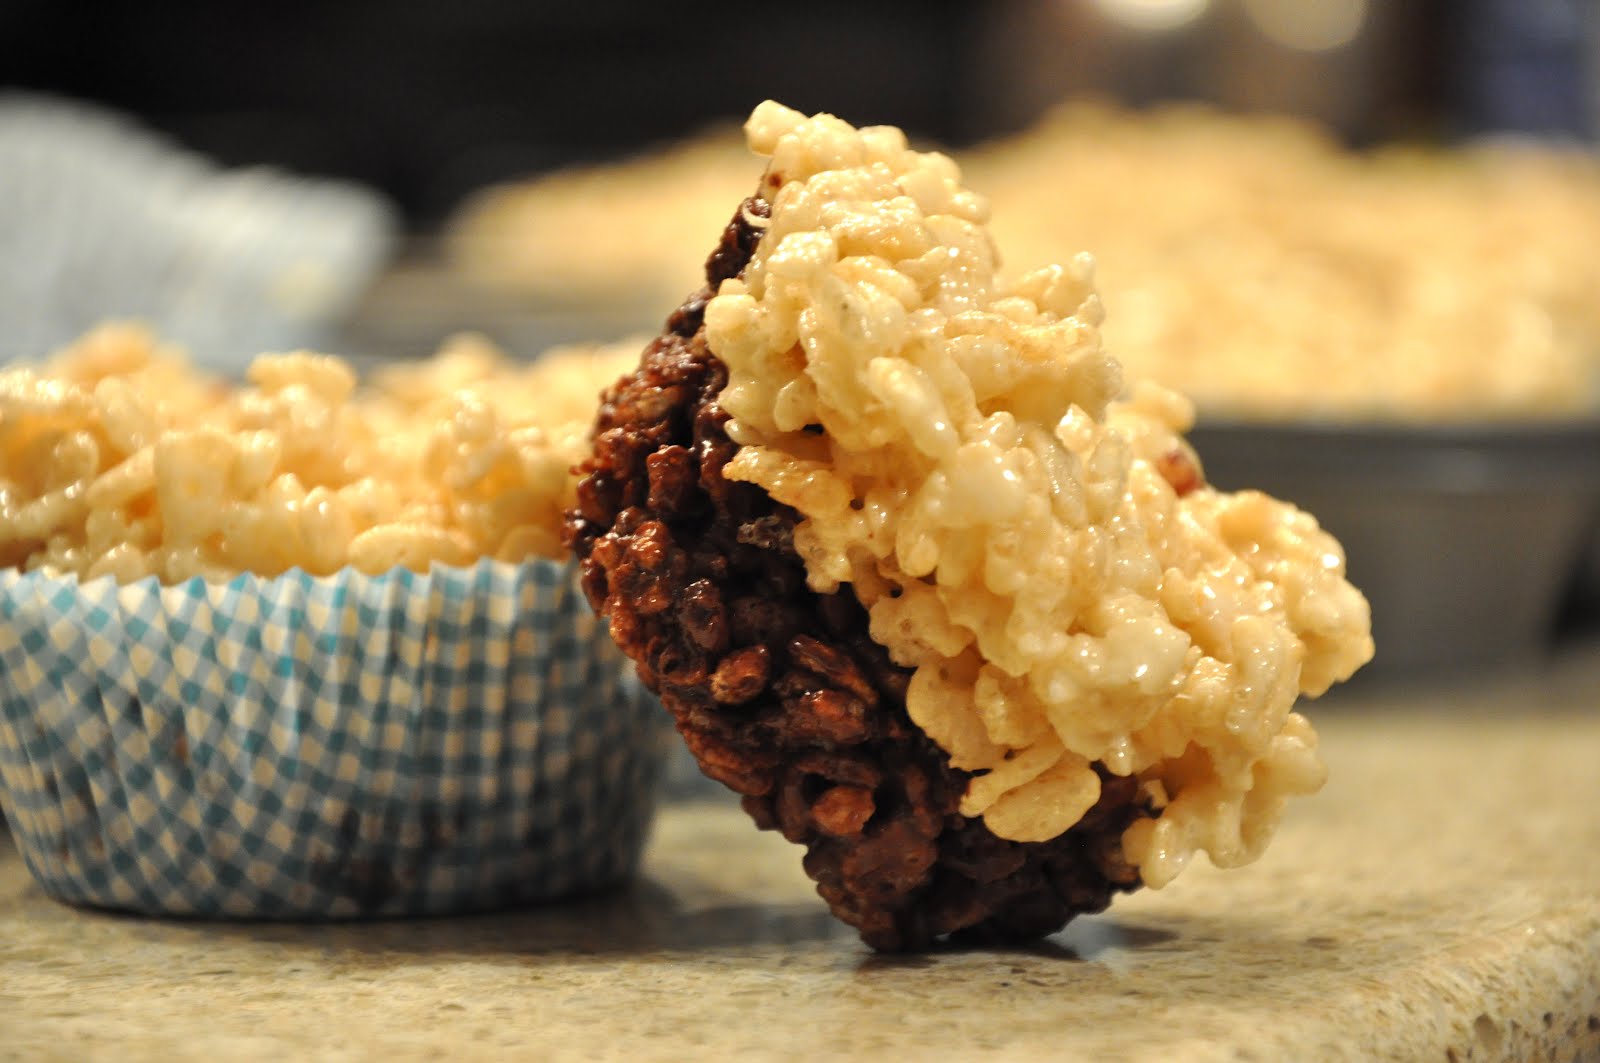
Rice Krispies were always one of my favorite treats as a kid. The crinkly blue package filled with crispy, sweet squares of marshmallow-covered cereal were the perfect after-school snack. A few years ago, when I became vegetarian, I gave up gelatin, and therefore, most marshmallows. A few weeks ago, I decided that too many things had gelatin in them and I was missing out on too much, so I went back to it. Since then, I've realized that the pre-packaged rice krispie treats are nothing compared to homemade ones. I usually use the classic recipe from the cereal company, but seeing all the variations on food blogs, I decided to try something new.
These are the greatest rice krispies I've ever had. They are made entirely of rice krispie cereal, not half of chocolate cereal, but half of the rice krispies are combined with cocoa powder and chocolate chunks. The chocolate offsets the extremely sweet marshmallows, and the bottom and top layers create the perfect balance of chocolate and vanilla. In my opinion, this is a much better treat than those little blue packages.
Enjoy! <3 Black and White Rice Krispies
(slightly adapted from Baking Bites)
4 tbsp butter, divided
1 1/2 oz bittersweet chocolate, chopped
1 tbsp cocoa powder
1 tsp vanilla extract
40 regular marshmallows or 4 cups mini marshmallows, divided 6
1/2 cups Rice Krispies/rice bubble cereal, divided
1/2 cup bittersweet chocolate, chopped, or mini chocolate chips
Line 18 muffin cups with paper liners.
In a large microwave-safe mixing bowl, melt 2 tbsp butter, 1 1/2 oz bittersweet chocolate, and cocoa powder. Stir frequently to fully incorporate cocoa and to prevent scorching. Add half of the marshmallows and microwave for 1-2 minutes, until fluffy and melted. Add in 3 1/4 cups rice krispies and stir to combine, making sure chocolate covers the whole batch. Stir in chopped bittersweet chocolate or chocolate chips and divide mixture evenly among prepared muffin tins, filling each 1/2 way up.
In a large microwave-safe mixing bowl, melt 2 tbsp butter and mini marshmallows in microwave for 2-3 minutes, until marshmallows are fluffy and butter is completely melted. Add in vanilla and remaining 3 1/4 cups rice krispies and stir to coat every rice krispie.
Divide evenly among chocolate-filled muffin tins, filling each the rest of the way up.
Chill in the refrigerator for 15 minutes or let set at room temperature before serving. Store in an airtight container at room temperature.
-makes 18 rice krispies
These are the greatest rice krispies I've ever had. They are made entirely of rice krispie cereal, not half of chocolate cereal, but half of the rice krispies are combined with cocoa powder and chocolate chunks. The chocolate offsets the extremely sweet marshmallows, and the bottom and top layers create the perfect balance of chocolate and vanilla. In my opinion, this is a much better treat than those little blue packages.
Enjoy! <3 Black and White Rice Krispies
(slightly adapted from Baking Bites)
4 tbsp butter, divided
1 1/2 oz bittersweet chocolate, chopped
1 tbsp cocoa powder
1 tsp vanilla extract
40 regular marshmallows or 4 cups mini marshmallows, divided 6
1/2 cups Rice Krispies/rice bubble cereal, divided
1/2 cup bittersweet chocolate, chopped, or mini chocolate chips
Line 18 muffin cups with paper liners.
In a large microwave-safe mixing bowl, melt 2 tbsp butter, 1 1/2 oz bittersweet chocolate, and cocoa powder. Stir frequently to fully incorporate cocoa and to prevent scorching. Add half of the marshmallows and microwave for 1-2 minutes, until fluffy and melted. Add in 3 1/4 cups rice krispies and stir to combine, making sure chocolate covers the whole batch. Stir in chopped bittersweet chocolate or chocolate chips and divide mixture evenly among prepared muffin tins, filling each 1/2 way up.
In a large microwave-safe mixing bowl, melt 2 tbsp butter and mini marshmallows in microwave for 2-3 minutes, until marshmallows are fluffy and butter is completely melted. Add in vanilla and remaining 3 1/4 cups rice krispies and stir to coat every rice krispie.
Divide evenly among chocolate-filled muffin tins, filling each the rest of the way up.
Chill in the refrigerator for 15 minutes or let set at room temperature before serving. Store in an airtight container at room temperature.
-makes 18 rice krispies
Saturday, July 21, 2012
Old-Fashioned Cranberry Orange Nut Bread
I recently realized that some of my favorite recipes aren't on here. Since I make them so often, I guess I never think to take pictures and put up the recipe; doing so is one of my new goals for this blog! This bread is one of my family's favorites. It is a hearty, moist loaf of sweet bread that is perfect for snacking on throughout the day. The flavors of orange and cranberry are delicious with the crunchy nuts, and the loaf will keep well for days.
I call it "Old-Fashioned" because it comes from a colonial cookbook. In elementary school, we had a "colonial day" at school where everybody had to bring in a recipe, and this was one that my teacher gave me. My mom and I, having baked very little from scratch, were cautious, but once we tasted it, very proud. I remember coming into school and telling everybody in my class how excited I was that this "bread" was actually like a cake - a pleasant surprise for a fourth grader! Once my aunt tasted this bread, it became her favorite recipe that I make. This week she wasn't feeling well, so we decided to send her a care package. I knew this had to be in there.
Despite how challenged we were by making this six years ago, yesterday I realized that this is a very simple recipe. Dry ingredients are stirred together, shortening is cut in, and wet ingredients and add-ins are combined. Quick to put together and ideal for a rainy afternoon. Trust me, the smell of this bread baking in the oven will make you want to bake it every day. Enjoy! <3 Old-Fashioned Cranberry Orange Nut Bread
(slightly adapted from Smithsonian Folklife Cookbook)
2 cups all-purpose flour
1 cup sugar
1 1/2 teaspoons baking powder
1 teaspoon salt
1/2 teaspoon baking soda
1/2 teaspoon nutmeg
1/2 teaspoon cinnamon
1/4 cup shortening
zest of one orange
3/4 cup orange juice
1 egg, slightly beaten
1 cup dried cranberries
1/2 cup chopped nuts
Preheat oven to 350 F.
Stir together dry ingredients. Cut in shortening.
Combine orange zest, juice, and egg. Add dry ingredients to egg mixture, stirring just enough to moisten. Fold in cranberries and nuts.
Pour batter into a greased 9 x 5 x 3-inch loaf pan. Bake for 60 minutes, or until a skewer inserted in center comes out clean. Cool, then wrap and store overnight before serving.
I call it "Old-Fashioned" because it comes from a colonial cookbook. In elementary school, we had a "colonial day" at school where everybody had to bring in a recipe, and this was one that my teacher gave me. My mom and I, having baked very little from scratch, were cautious, but once we tasted it, very proud. I remember coming into school and telling everybody in my class how excited I was that this "bread" was actually like a cake - a pleasant surprise for a fourth grader! Once my aunt tasted this bread, it became her favorite recipe that I make. This week she wasn't feeling well, so we decided to send her a care package. I knew this had to be in there.
Despite how challenged we were by making this six years ago, yesterday I realized that this is a very simple recipe. Dry ingredients are stirred together, shortening is cut in, and wet ingredients and add-ins are combined. Quick to put together and ideal for a rainy afternoon. Trust me, the smell of this bread baking in the oven will make you want to bake it every day. Enjoy! <3 Old-Fashioned Cranberry Orange Nut Bread
(slightly adapted from Smithsonian Folklife Cookbook)
2 cups all-purpose flour
1 cup sugar
1 1/2 teaspoons baking powder
1 teaspoon salt
1/2 teaspoon baking soda
1/2 teaspoon nutmeg
1/2 teaspoon cinnamon
1/4 cup shortening
zest of one orange
3/4 cup orange juice
1 egg, slightly beaten
1 cup dried cranberries
1/2 cup chopped nuts
Preheat oven to 350 F.
Stir together dry ingredients. Cut in shortening.
Combine orange zest, juice, and egg. Add dry ingredients to egg mixture, stirring just enough to moisten. Fold in cranberries and nuts.
Pour batter into a greased 9 x 5 x 3-inch loaf pan. Bake for 60 minutes, or until a skewer inserted in center comes out clean. Cool, then wrap and store overnight before serving.
Subscribe to:
Posts (Atom)